 단위 테스트와 통합 테스트의 역할 - Spring Boot로 시작하는 TDD 13편Roles of Unit Testing vs Integration Testing - TDD with Spring Boot Part 13
📅
들어가기 전에 🔗
지금까지 우리는 꽤 많은 테스트 코드를 작성했습니다.
ProductTest: 상품 객체 스스로의 로직 검증 (할인, 가격 규칙)ProductServiceTest: Mock을 이용한 비즈니스 로직 검증ProductRepositoryTest: DB 저장 및 조회 검증ProductControllerTest: API 요청/응답 검증
이것들은 대부분
단위 테스트(Unit Test)
에 속합니다.
레고 블록 하나하나가 불량이 아닌지 검사하는 단계였죠.하지만 블록들이 멀쩡해도, 막상 조립해 보면 구멍이 안 맞거나 무너질 수 있습니다.
그래서 오늘은 조립된 완성품을 테스트하는
통합 테스트(Integration Test)
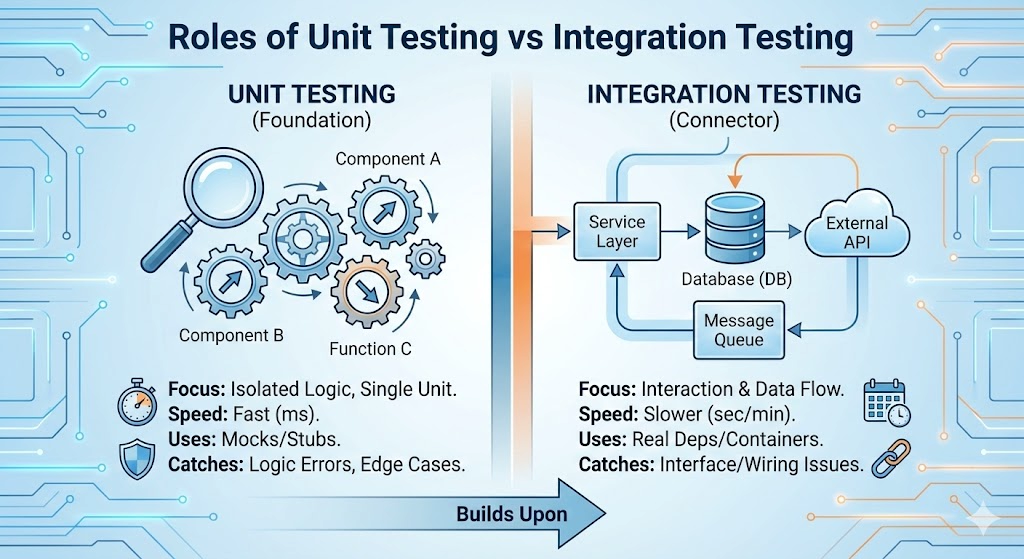
에 대해 알아보고 직접 작성해 보겠습니다.단위 테스트 vs 통합 테스트 🔗
이 둘을 구분하는 기준은
"격리(Isolation)"
입니다.1. 단위 테스트 (Unit Test) 🔗
자동차 부품 공장에서 '엔진' 하나만 꺼내서 돌려보는 것입니다.
- 특징외부(DB, 네트워크)와 단절되어 있습니다. 실행 속도가 엄청나게 빠릅니다 (수 밀리초).
Mockito같은 가짜 객체(Mock)를 적극 사용합니다. - 목적:"내 로직이 틀리지 않았나?" 검증.
2. 통합 테스트 (Integration Test) 🔗
자동차를 다 조립하고 도로주행을 해보는 것입니다.
- 특징실제 DB, 실제 스프링 빈(Bean)을 모두 사용합니다. 실행 속도가 느립니다 (스프링을 띄워야 하므로 수 초 이상).
- 목적:"부품끼리 연결이 잘 되었나? 실제 환경에서도 잘 도나?" 검증.
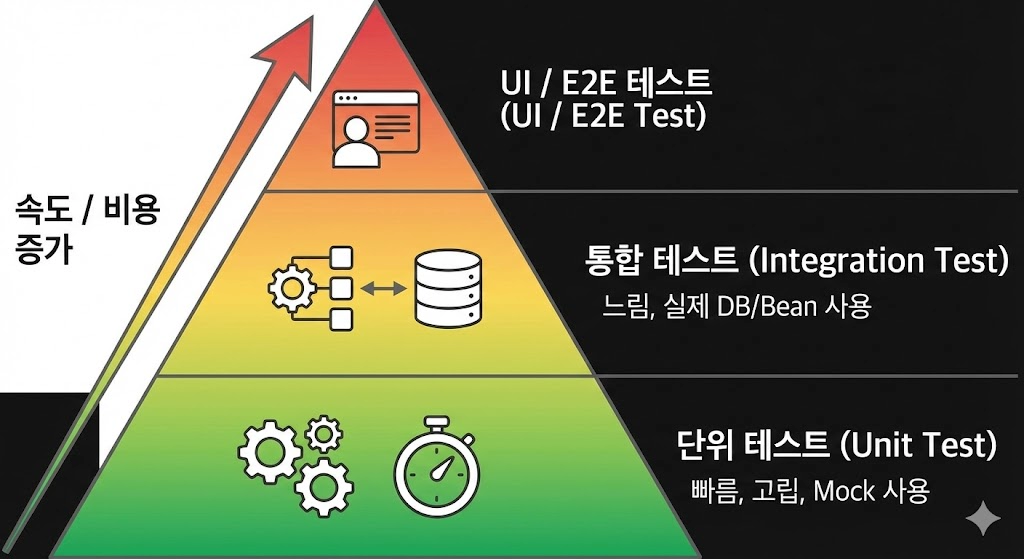
테스트 피라미드
1단계: 통합 테스트 작성 🔗
우리는
@SpringBootTest를 사용하여 [요청 -> Controller -> Service -> Repository -> H2 DB]
로 이어지는 모든 과정을 한 번에 검증할 것입니다.테스트 클래스 생성 🔗
src/test/java/com/example/tdd_study/product/ProductIntegrationTest.java 파일을 생성합니다.package com.example.tdd_study.product;
import com.example.tdd_study.product.dto.AddProductRequest;
import com.fasterxml.jackson.databind.ObjectMapper;
import org.junit.jupiter.api.Test;
import org.springframework.beans.factory.annotation.Autowired;
import org.springframework.boot.test.autoconfigure.web.servlet.AutoConfigureMockMvc;
import org.springframework.boot.test.context.SpringBootTest;
import org.springframework.http.MediaType;
import org.springframework.test.web.servlet.MockMvc;
import org.springframework.test.web.servlet.ResultActions;
import org.springframework.transaction.annotation.Transactional;
import static org.springframework.test.web.servlet.request.MockMvcRequestBuilders.post;
import static org.springframework.test.web.servlet.result.MockMvcResultHandlers.print;
import static org.springframework.test.web.servlet.result.MockMvcResultMatchers.status;
@SpringBootTest // [핵심] 스프링 컨테이너를 실제로 띄웁니다.
@AutoConfigureMockMvc // API 요청을 보내기 위한 도구
@Transactional // 테스트 후 DB 롤백
class ProductIntegrationTest {
@Autowired
private MockMvc mockMvc;
@Autowired
private ObjectMapper objectMapper;
@Test
void 상품_등록_통합_테스트() throws Exception {
// given
System.out.println(">>> [통합 테스트] 시작: 상품 등록 요청 준비");
String name = "통합 테스트 커피";
int price = 5000;
AddProductRequest request = new AddProductRequest(name, price);
String jsonBody = objectMapper.writeValueAsString(request);
// when
System.out.println(">>> [통합 테스트] API 호출 수행");
ResultActions response = mockMvc.perform(post("/products")
.contentType(MediaType.APPLICATION_JSON)
.content(jsonBody));
// then
response.andExpect(status().isOk())
.andDo(print()); // 로그 출력
}
}2단계: 실패 시 원인 분석 🔗
저는 이 테스트를 실행했을 때 실패했습니다. 왜냐하면 지금이 밤 7시였기 때문이죠.

실패
콘솔에 찍힌 로그를 통해 원인을 분석해 봅시다.
실패 로그 분석 🔗
>>> [Controller] 상품 등록 요청 진입
...
>>> [Controller] 생성된 현재 시간(now): 2025-12-16T19:28:25.674834
...
>>> [Service] 수신된 시간: 2025-12-16T19:28:25.674834
>>> [Service-Fail] 영업 시간이 아님! (현재 시각: 19시)
원인:
통합 테스트가 실제 시스템 시간(Real Time)
을 사용했기 때문입니다.
Controller가 LocalDateTime.now()를 호출해서 현재 시간(밤 7시)을 Service에 넘겼고, 영업 시간(09~18) 체크 로직에 걸려 실패한 것입니다.이것이 통합 테스트의 어려움입니다.
내가 제어할 수 없는
외부 환경(시간)
때문에 테스트가 실패한 것이죠.3단계: Clock Bean을 이용한 해결 🔗
이 문제를 해결하려면 Controller가 시간을 직접 만들지 말고,
스프링에게 시간을 물어보도록
구조를 바꿔야 합니다.
Clock 객체를 빈으로 등록하고 주입받으면, 테스트에서 시간을 멈출 수 있습니다.1. Clock Bean 등록 🔗
메인 클래스에
Clock 빈을 등록합니다.package com.example.tdd_study;
import org.springframework.boot.SpringApplication;
import org.springframework.boot.autoconfigure.SpringBootApplication;
import org.springframework.context.annotation.Bean;
import java.time.Clock;
@SpringBootApplication
public class TddStudyApplication {
public static void main(String[] args) {
SpringApplication.run(TddStudyApplication.class, args);
}
// [필수] 시간(Clock)를 스프링 빈으로 등록
@Bean
public Clock clock() {
return Clock.systemDefaultZone();
}
}2. Controller 수정 (로그 포함) 🔗
Controller가
Clock을 주입받아 사용하도록 수정합니다.
확인을 위해 상세한 로그를 남겨두겠습니다.package com.example.tdd_study.product;
import com.example.tdd_study.product.dto.AddProductRequest;
import jakarta.validation.Valid;
import org.springframework.web.bind.annotation.PostMapping;
import org.springframework.web.bind.annotation.RequestBody;
import org.springframework.web.bind.annotation.RestController;
import java.time.Clock;
import java.time.LocalDateTime;
@RestController
public class ProductController {
private final ProductService productService;
private final Clock clock; // [추가] 시간를 주입받습니다.
public ProductController(ProductService productService, Clock clock) {
this.productService = productService;
this.clock = clock;
}
@PostMapping("/products")
public void register(@RequestBody @Valid AddProductRequest request) {
System.out.println(">>> [Controller] 상품 등록 요청 진입");
System.out.println(">>> [Controller] 요청 파라미터(Name): " + request.getName());
// [CCTV] 사용 중인 시간 확인
System.out.println(">>> [Controller] 사용 중인 Clock 클래스: " + clock.getClass().getName());
// [핵심] clock을 사용하여 시간을 만듭니다.
LocalDateTime now = LocalDateTime.now(clock);
System.out.println(">>> [Controller] 생성된 현재 시간(now): " + now);
productService.register(request.getName(), request.getPrice(), now);
}
}3. Service 로그 확인 🔗
Service에도 로그가 잘 심어져 있는지 확인합니다.
package com.example.tdd_study.product;

import com.example.tdd_study.notification.NotificationCenter;
import org.springframework.stereotype.Service;
import org.springframework.transaction.annotation.Transactional;
import java.time.LocalDateTime;

@Service
public class ProductService {
    private final ProductRepository productRepository;
    private final NotificationCenter notificationCenter;

    public ProductService(ProductRepository productRepository,
                          NotificationCenter notificationCenter) {
        this.productRepository = productRepository;
        this.notificationCenter = notificationCenter;
    }

    @Transactional
    public void register(String name, int price, LocalDateTime now) {
        Product product = new Product(name, price);

        System.out.println(">>> [Service] register() 진입");
        System.out.println(">>> [Service] 수신된 시간: " + now);

        if (now.getHour() < 9 || now.getHour() >= 18) {
            System.out.println(">>> [Service-Fail] 영업 시간이 아님! (현재 시각: " + now.getHour() + "시)");
            throw new IllegalStateException("영업 시간이 아닙니다.");
        }
        System.out.println(">>> [Service-Pass] 시간 검증 통과!");

        productRepository.save(product);
        notificationCenter.send("새로운 상품이 등록되었습니다: " + name);
    }
}
4단계: 통합 테스트 최종 수정 (가짜 시간 적용) 🔗
이제 테스트 코드에서
@MockBean을 사용하여 실제 시간 대신 가짜 시간을 주입합니다.
여기서 주의할 점은 타임존(TimeZone)
입니다. 단순히 UTC로 설정하면 한국 시간 변환 시 시간이 틀어질 수 있으므로 ZoneId.systemDefault()를 사용해야 안전합니다.package com.example.tdd_study.product;
import com.example.tdd_study.product.dto.AddProductRequest;
import com.fasterxml.jackson.databind.ObjectMapper;
import org.junit.jupiter.api.Test;
import org.springframework.beans.factory.annotation.Autowired;
import org.springframework.boot.test.autoconfigure.web.servlet.AutoConfigureMockMvc;
import org.springframework.boot.test.context.SpringBootTest;
import org.springframework.boot.test.mock.mockito.MockBean;
import org.springframework.http.MediaType;
import org.springframework.test.web.servlet.MockMvc;
import org.springframework.test.web.servlet.ResultActions;
import org.springframework.transaction.annotation.Transactional;
import java.time.Clock;
import java.time.ZoneId;
import java.time.ZonedDateTime;
import static org.mockito.BDDMockito.given;
import static org.springframework.test.web.servlet.request.MockMvcRequestBuilders.post;
import static org.springframework.test.web.servlet.result.MockMvcResultHandlers.print;
import static org.springframework.test.web.servlet.result.MockMvcResultMatchers.status;
@SpringBootTest
@AutoConfigureMockMvc
@Transactional
class ProductIntegrationTest {
@Autowired
private MockMvc mockMvc;
@Autowired
private ObjectMapper objectMapper;
@MockBean // [핵심] 실제 Clock 대신 가짜(Mock) Clock을 주입합니다.
private Clock clock;
@Test
void 상품_등록_통합_테스트() throws Exception {
// given
System.out.println(">>> [Test] 통합 테스트 시작");
// [핵심] 타임존을 고려하여 '낮 12시'로 시간을 고정합니다.
ZonedDateTime fixedDateTime = ZonedDateTime.of(2025, 1, 1, 12, 0, 0, 0, ZoneId.systemDefault());
System.out.println(">>> [Test] Mock Clock 시간 설정: " + fixedDateTime);
given(clock.instant()).willReturn(fixedDateTime.toInstant());
given(clock.getZone()).willReturn(ZoneId.systemDefault());
String name = "통합 테스트 커피";
int price = 5000;
AddProductRequest request = new AddProductRequest(name, price);
String jsonBody = objectMapper.writeValueAsString(request);
// when
System.out.println(">>> [Test] API 호출 (POST /products)");
ResultActions response = mockMvc.perform(post("/products")
.contentType(MediaType.APPLICATION_JSON)
.content(jsonBody));
// then
response.andExpect(status().isOk())
.andDo(print());
System.out.println(">>> [Test] 검증 완료");
}
}5단계: 성공 로그 확인 🔗
이제 다시 테스트를 실행하면 성공할 것입니다.
로그를 통해 정말 가짜 시간이 적용되었는지 확인해 보세요.
>>> [Controller] 사용 중인 Clock 클래스: org.springframework.boot.test.mock.mockito.MockitoPostProcessor$Spy... (Mock 객체 확인!)
>>> [Controller] 생성된 현재 시간(now): 2025-01-01T12:00 (12시 확인!)
...
>>> [Service-Pass] 시간 검증 통과!
결론 🔗
- 통합 테스트의 함정실제 환경을 사용하다 보니 시간, 네트워크 같은 요소에 의해 테스트가 깨지기 쉽습니다.
- Clock Bean 활용시간을 직접 생성하지 않고 빈으로 주입받게 하여 제어권을 확보했습니다.
이제 여러분의 테스트는 밤이든 낮이든, 한국이든 미국이든 언제나 성공하는 견고한 코드가 되었습니다.
다음 시간에는실무에서의 TDD 적용 시 고려사항에 대해 이야기하며, 이 시리즈를 마무리할 준비를 하겠습니다.
참고 🔗
- The Test Pyramid (Martin Fowler)↗ 마틴 파울러가 설명하는 테스트 피라미드 개념과 실용적인 테스트 전략 가이드입니다.
- Testing in Spring Boot↗ 스프링 부트에서 제공하는 다양한 테스트 어노테이션(@SpringBootTest, @WebMvcTest 등)의 차이를 설명한 공식 문서입니다.
- Testing Time with Clock↗ Java의 Clock 클래스를 사용하여 시간을 테스트하는 다양한 패턴을 소개합니다.