 WalletKit 세션 연결하기 (React Native, Reown)Connect WalletKit Session (React Native, Reown)
📅
들어가기 전에 🔗
Reown walletKit 설치 및 초기설정 (React Native) 포스팅에서 이어지는 내용입니다.
이전 포스팅에서 React Native(Expo) 환경에서 Reown WalletKit을 설치하고 초기 설정하는 방법을 알아보았습니다. 이번 포스팅에서는 WalletKit에 세션을 연결하는 방법을 알아보겠습니다.
테스트는 이더리움(ETH) 네트워크를 기준으로 진행하겠습니다. 마지막에 전체 코드를 확인하실 수 있습니다.
세션이란? 🔗
세션은 디앱과 지갑 사이의 연결입니다. 사용자가 디앱의 세션 제안을 승인하면 세션이 설정됩니다. 세션은 사용자가 디앱과의 연결을 끊거나 세션이 만료될 때까지 활성 상태입니다.
전체적인 플로우는 다음과 같습니다.
- 디앱에서 세션을 제안합니다.
- 사용자가 세션을 승인합니다.
- 세션이 설정됩니다.
- 디앱은 세션을 통해 지갑과 통신합니다.
이번 포스팅에서는 세션을 제안하고 승인하는 과정까지를 알아보겠습니다.
Namespace Builder 생성 🔗
WalletKit에서 세션을 연결하기 위해서는 Namespace Builder를 생성해야 합니다. Namespace Builder는 세션을 제안하고 승인하는 과정을 담당합니다. wallet에는 사용자의 지갑 정보가 담겨있습니다. 이전 포스팅에서 wallet을 생성했다면
HDNodeWallet 타입을 가지는 wallet을 사용하면 됩니다. buildApprovedNamespaces 함수를 사용하여 Namespace Builder를 생성합니다.namespace 파라미터 설정 🔗
먼저, builder를 생성하기 위해 필요한 파라미터를 알아보겠습니다.
// util params
{
  proposal: ProposalTypes.Struct; // the proposal received by `.on("session_proposal")`
  supportedNamespaces: Record< // your Wallet's supported namespaces
    string, // the supported namespace key e.g. eip155
    {
      chains: string[]; // your supported chains in CAIP-2 format e.g. ["eip155:1", "eip155:2", ...]
      methods: string[]; // your supported methods e.g. ["personal_sign", "eth_sendTransaction"]
      events: string[]; // your supported events e.g. ["chainChanged", "accountsChanged"]
      accounts: string[] // your user's accounts in CAIP-10 format e.g. ["eip155:1:0x453d506b1543dcA64f57Ce6e7Bb048466e85e228"]
      }
  >;
};- proposal: 세션 제안을 받은 후
.on("session_proposal")이벤트에서 받은 proposal - supportedNamespaces: 사용자의 wallet이 지원하는 namespace 정보
- chains: CAIP-2 형식의 지원하는 chain 정보 : e.g. ["eip155:1", "eip155:2", ...]
- methods: 지원하는 메소드 정보 : e.g. ["personal_sign", "eth_sendTransaction"]
- events: 지원하는 이벤트 정보 : e.g. ["chainChanged", "accountsChanged"]
- accounts: 사용자의 지갑 정보 : e.g. ["eip155:1:0x453d506b1543dcA64f57Ce6e7Bb048466e85e228"]
proposal은 추후에 세션 제안을 받은 후
.on("session_proposal") 이벤트에서 받은 proposal을 사용하면 됩니다.Namespace Builder 생성 🔗
Namespace Builder를 생성하기 위해 buildApprovedNamespaces 함수를 사용합니다. buildApprovedNamespaces 함수는 위에서 설명한 파라미터를 받아 Namespace Builder를 생성합니다.
params는 추후에 세션 제안을 받은 후
.on("session_proposal") 이벤트에서 받은 proposal을 사용할 예정이고, supportedNamespaces는 사용자의 wallet이 지원하는 namespace 정보를 설정하면 됩니다.
여기서는 eip155 namespace를 사용하여 이더리움 메인넷과 폴리곤 메인넷을 지원하는 예시를 보여드리겠습니다. 체인 리스트는 reown-com: web-examples↗에서 확인할 수 있습니다. chain
에 배열 형태로 지원하는 chain 리스트를 넣어주면 됩니다.
methods
, events
에는 reown에서 지원하는 메소드와 이벤트 중 원하는 항목을 골라 사용하면 됩니다. accounts
에는 각 체인에 해당하는 사용자의 지갑 주소 정보를 넣어주면 됩니다.reown에서 지원하는 메소드와 이벤트 목록
{
  methods: [
    "eth_accounts",
    "eth_requestAccounts",
    "eth_sendRawTransaction",
    "eth_sign",
    "eth_signTransaction",
    "eth_signTypedData",
    "eth_signTypedData_v3",
    "eth_signTypedData_v4",
    "eth_sendTransaction",
    "personal_sign",
    "wallet_switchEthereumChain",
    "wallet_addEthereumChain",
    "wallet_getPermissions",
    "wallet_requestPermissions",
    "wallet_registerOnboarding",
    "wallet_watchAsset",
    "wallet_scanQRCode",
    "wallet_sendCalls",
    "wallet_getCallsStatus",
    "wallet_showCallsStatus",
    "wallet_getCapabilities",
  ],
  events: [
    "chainChanged",
    "accountsChanged",
    "message",
    "disconnect",
    "connect",
  ]
}
// 추후 세션 제안을 받은 후 `.on("session_proposal")` 이벤트에서 받은
// proposal 파라미터를 사용할 예정이기 때문에 참고만 해 주세요.
import { buildApprovedNamespaces } from "@reown/walletkit";
// ...
const approvedNamespaces = buildApprovedNamespaces({
proposal: params,
supportedNamespaces: {
eip155: {
chains: ['eip155:1', 'eip155:137'],
methods: ['eth_sendTransaction', 'personal_sign'],
events: ['accountsChanged', 'chainChanged'],
accounts: [
'eip155:1:' + "0xab16a96d359ec26a11e2c2b3d8f8b8942d5bfcdb", // 사용자의 이더리움 메인넷 지갑 주소 넣기
'eip155:137:' + "0xab16a96d359ec26a11e2c2b3d8f8b8942d5bfcdb", // 사용자의 폴리곤 메인넷 지갑 주소 넣기
],
},
},
});
// ...onSessionProposal 이벤트 함수 만들기 🔗
세션 제안을 받은 후
.on("session_proposal") 이벤트에서 proposal을 받아 Namespace Builder를 생성하고, Approve를 통해 세션을 승인하는 함수를 만들어보겠습니다.
먼저, onSessionProposal 함수를 만들어 세션 제안을 받은 후 Namespace Builder를 생성하고 세션을 승인하는 과정을 작성합니다. 세션을 승인하면 세션이 설정되고, 세션을 거절하면 거절 사유를 반환합니다.
세션을 승인하는 함수는 approveSession 메소드를 사용하고, 세션을 거절하는 함수는 rejectSession 메소드를 사용합니다.import { buildApprovedNamespaces, getSdkError } from "@reown/walletkit";
import { Alert, Button, Text, TextInput } from 'react-native';
// ...
const App = () => {
const [walletKit, setWalletKit] = useState<WalletKitType>();
// ...
async function onSessionProposal({
id,
params,
}: WalletKitTypes.SessionProposal) {
try {
const approvedNamespaces = buildApprovedNamespaces({
proposal: params,
supportedNamespaces: {
eip155: {
chains: ['eip155:1', 'eip155:137'],
methods: ['eth_sendTransaction', 'personal_sign'],
events: ['accountsChanged', 'chainChanged'],
accounts: [
'eip155:1:' + "0xab16a96d359ec26a11e2c2b3d8f8b8942d5bfcdb", // 사용자의 이더리움 메인넷 지갑 주소 넣기
'eip155:137:' + "0xab16a96d359ec26a11e2c2b3d8f8b8942d5bfcdb", // 사용자의 폴리곤 메인넷 지갑 주소 넣기
],
},
},
});
const session = await walletKit?.approveSession({
id,
namespaces: approvedNamespaces,
});
Alert.alert('Session Approved');
console.log('session', session);
} catch (error) {
console.error(error);
await walletKit?.rejectSession({
id: params.id,
reason: getSdkError('USER_REJECTED'),
});
}
}
// ...
}
// ...세션 제안 이벤트 등록하기 🔗
세션 제안 이벤트를 등록하고, 세션 제안을 받은 후 onSessionProposal 함수를 실행하도록 하겠습니다.
// ...
const App = () => {
  // ...
  useEffect(() => {
    walletKit?.on('session_proposal', onSessionProposal);
    return () => {
      walletKit?.off('session_proposal', onSessionProposal);
    };
  }, [walletKit]);
  // ...
}
// ...
WalletConnect URI 입력하기 🔗
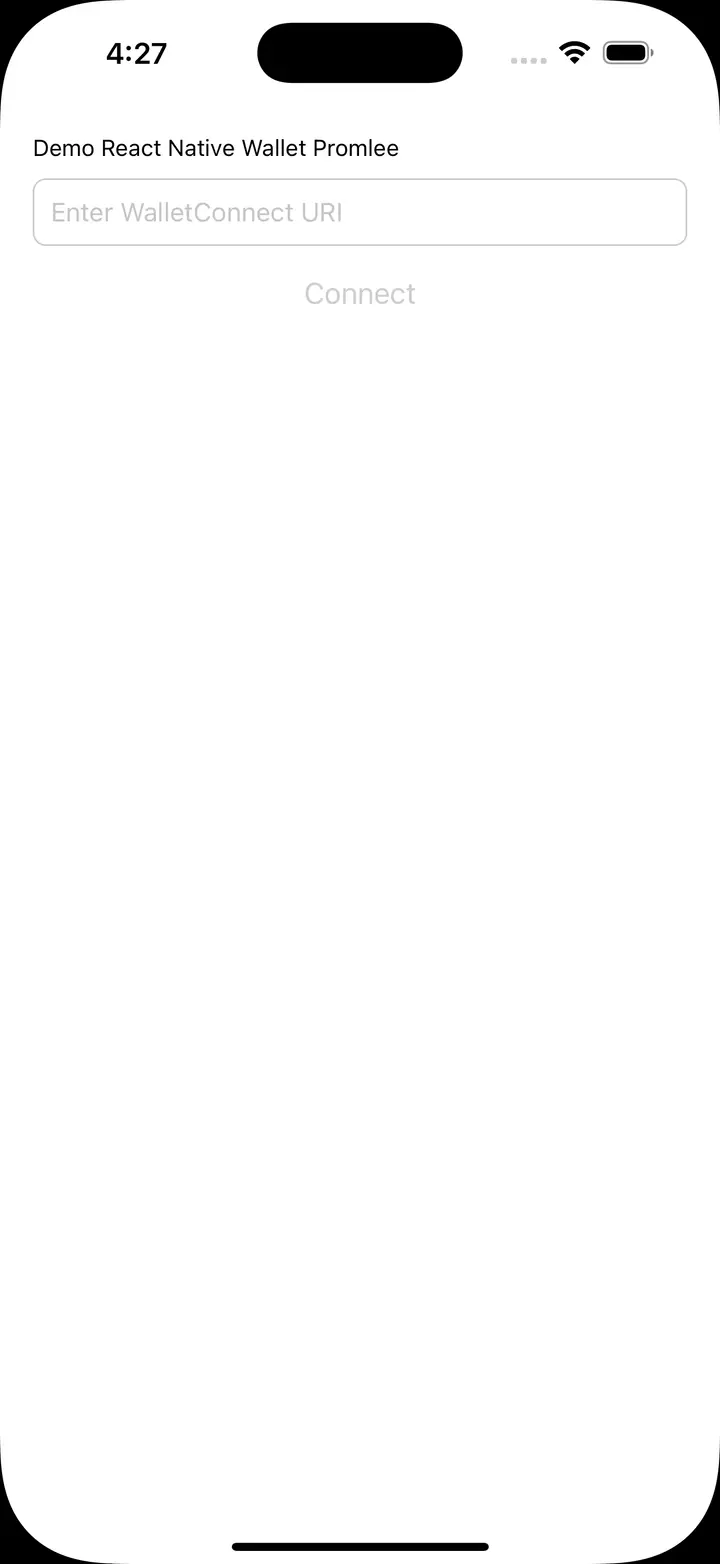
마지막으로, WalletConnect URI를 입력받아 WalletKit과 연결하는 버튼을 만들어보겠습니다.
// ...

const App = () => {
	// ...
	const [uri, setUri] = useState('');

	return (
		<SafeAreaView style={{ padding: 20 }}>
			<Text>{walletKit?.metadata.name}</Text>
			<TextInput
				placeholder="Enter WalletConnect URI"
				value={uri}
				onChangeText={setUri}
				style={{
					width: '100%',
					marginVertical: 10,
					padding: 10,
					fontSize: 16,
					borderRadius: 8,
					borderWidth: 1,
					borderColor: '#ccc',
					marginBottom: 10,
				}}
			/>
			<Button
				title="Connect"
				onPress={() => walletKit?.pair({ uri })}
				disabled={!uri}
			/>
		</SafeAreaView>
	);
};

export default App;
이제 세션 제안을 받아 승인하는 과정까지 완료되었습니다. 이제 앱을 실행하고 WalletConnect URI를 입력하여 WalletKit과 연결해보도록 하겠습니다.
세션 연결 테스트하기 🔗
앱을 실행하고, WalletConnect URI를 입력한 후 Connect 버튼을 눌러 세션을 연결해보겠습니다. 세션을 제안하면 onSessionProposal 함수가 실행되고, 세션을 승인하면 세션이 설정됩니다.
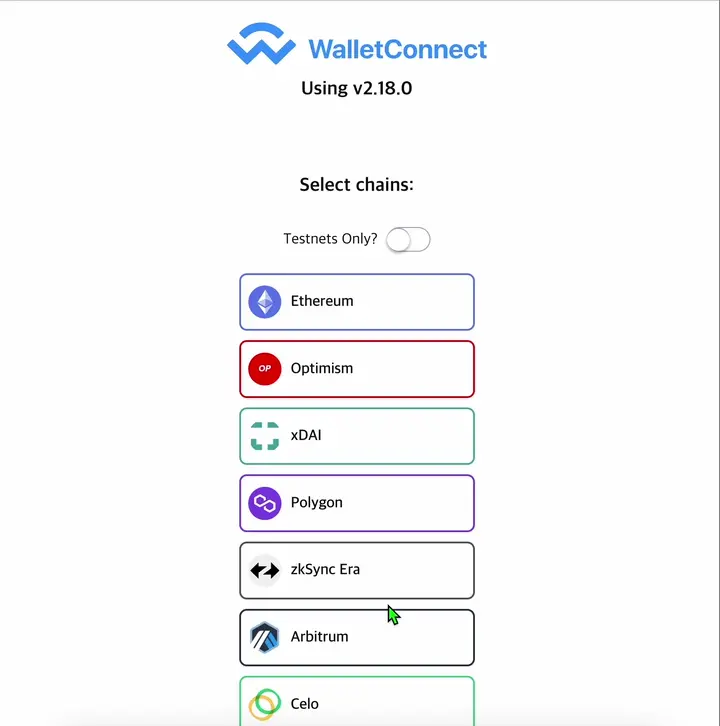
WalletConnect URI는 react-app.walletconnect↗에서 제공하는 디앱을 사용하여 생성할 수 있습니다. 브라우저로 접속하여 WalletConnect URI를 생성하고, 클립보드에 복사한 후 앱에서 입력하면 됩니다.
- 아래 영상을 참고해서 WalletConnect URI를 생성하고, 클립보드에 복사합니다. (new pairing 버튼은 안뜰 수 있습니다.) 이 팝업창은 끄지 말고 다음 단계로 넘어가세요.
- 앱에서 Input 박스에 WalletConnect URI를 입력하고 연결합니다.
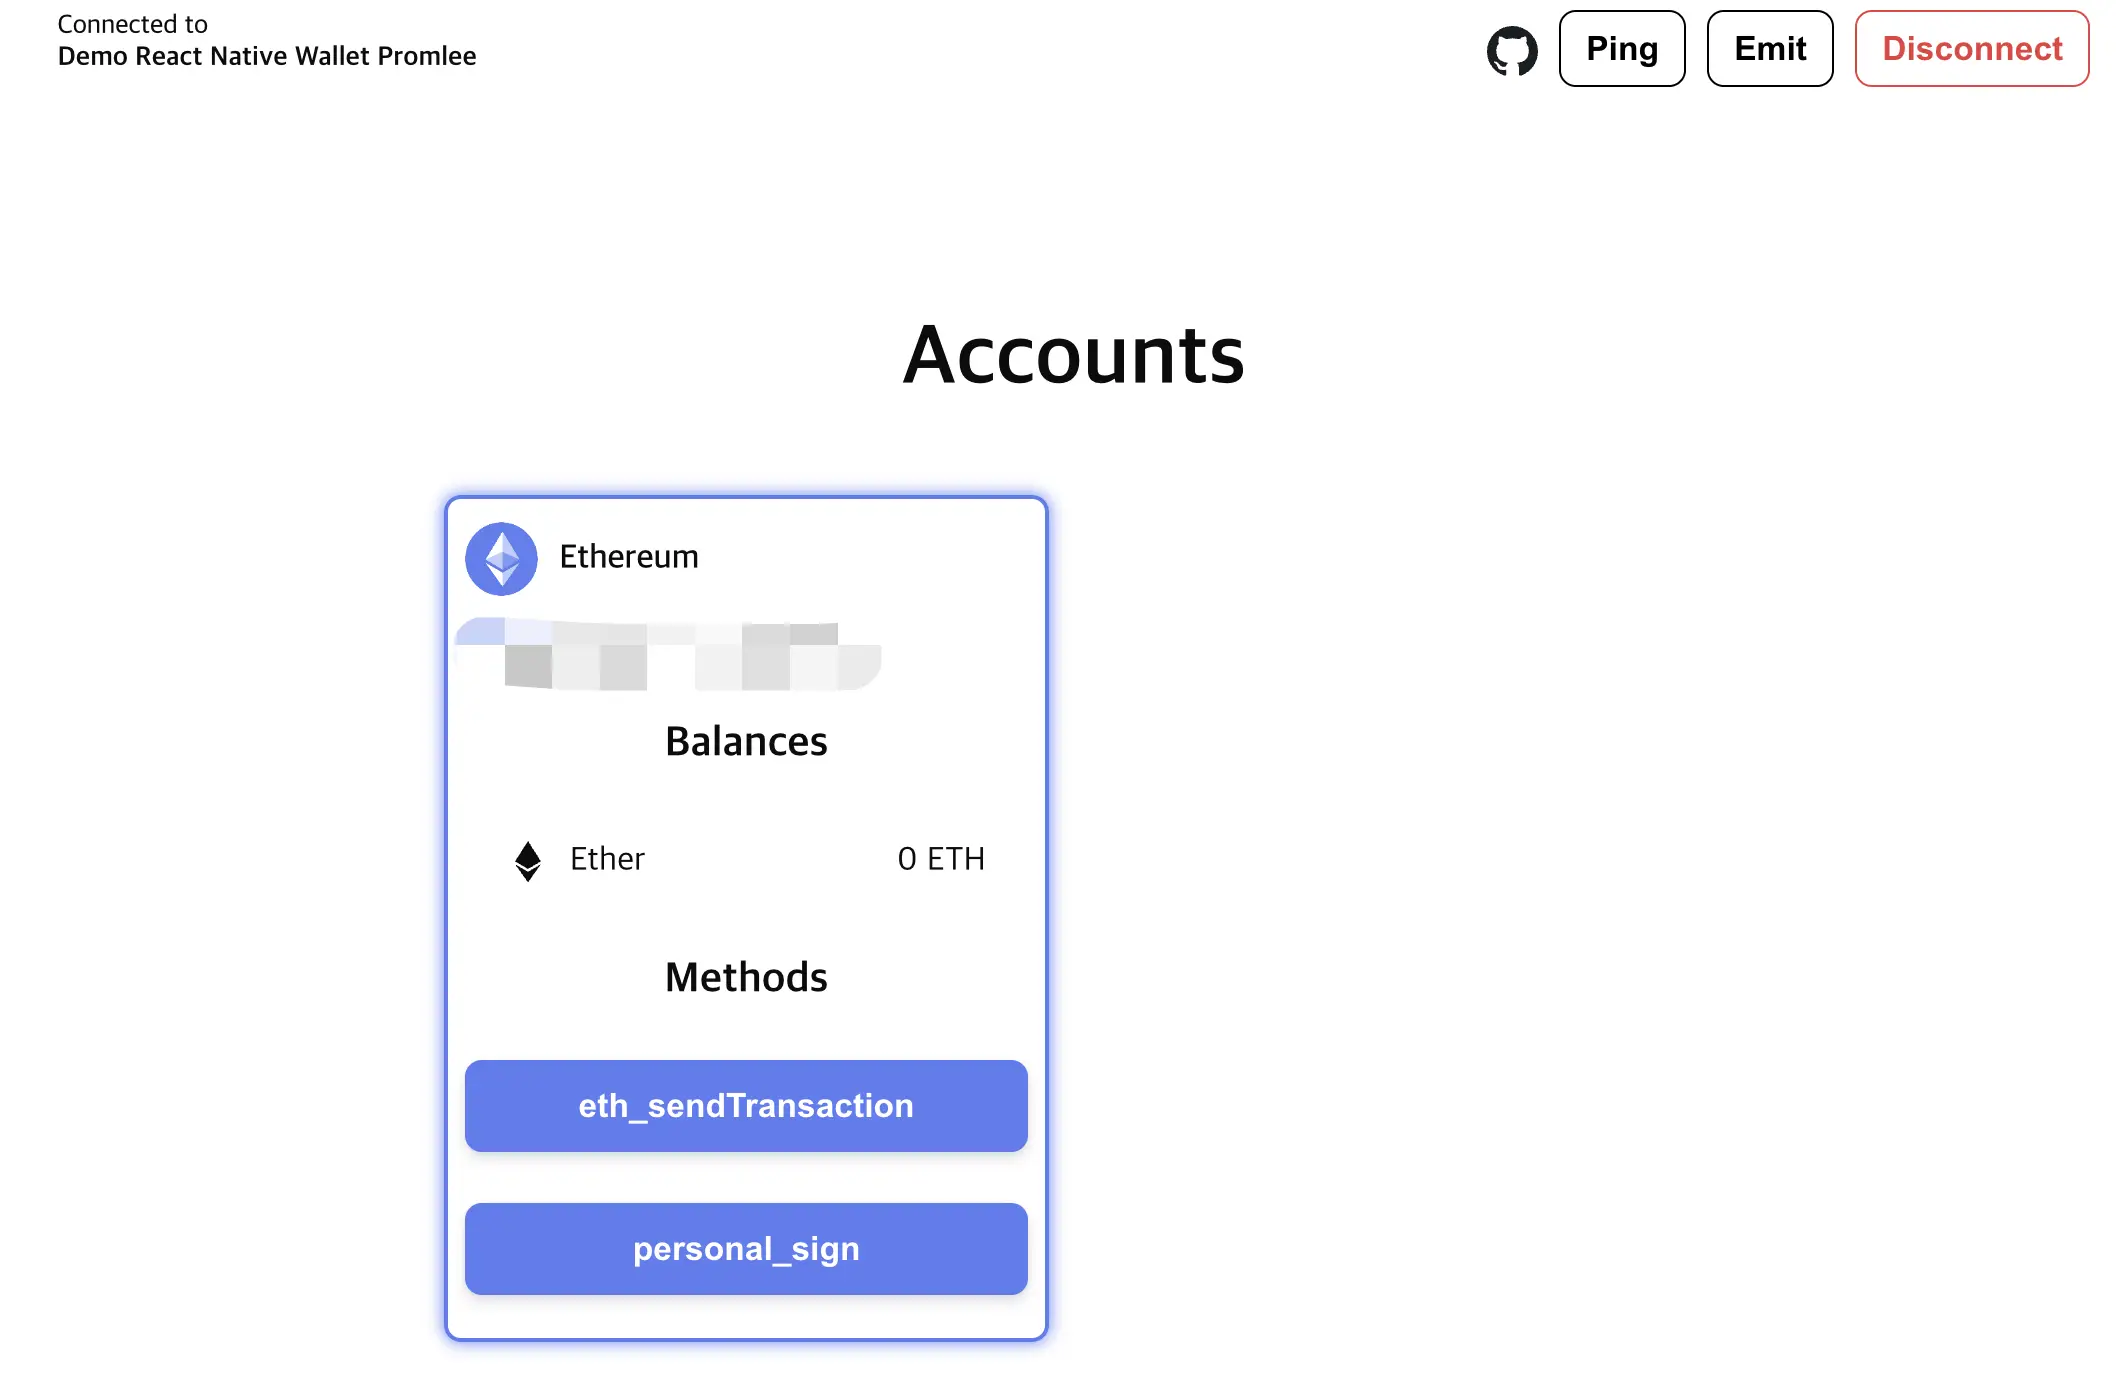
- 세션을 승인하면 세션이 설정됩니다. react-app.walletconnect↗ 화면을 다시 보면 세션이 설정된 것을 확인할 수 있습니다. console.log로 찍힌 세션 정보를 확인할 수도 있습니다.
결론 🔗
전체 코드 🔗
import '@walletconnect/react-native-compat';
import { WalletKit, WalletKitTypes } from '@reown/walletkit';
import { WalletKit as WalletKitType } from '@reown/walletkit/dist/types/client';
import { Core } from '@walletconnect/core';
import { buildApprovedNamespaces, getSdkError } from '@walletconnect/utils';
import { useEffect, useState } from 'react';
import { Alert, Button, Text, TextInput } from 'react-native';
import { SafeAreaView } from 'react-native-safe-area-context';

import useGetwallet from '@/hooks/useGetwallet';

const core = new Core({
  projectId: 'your_project_id',
});

const App = () => {
  const wallet = useGetwallet();
  const [walletKit, setWalletKit] = useState<WalletKitType | null>(null);
  const [uri, setUri] = useState('');

  async function onSessionProposal({
    id,
    params,
  }: WalletKitTypes.SessionProposal) {
    try {
      const approvedNamespaces = buildApprovedNamespaces({
        proposal: params,
        supportedNamespaces: {
          eip155: {
            chains: ['eip155:1', 'eip155:137'],
            methods: ['eth_sendTransaction', 'personal_sign'],
            events: ['accountsChanged', 'chainChanged'],
            accounts: [
              'eip155:1:' +  "0xab16a96d359ec26a11e2c2b3d8f8b8942d5bfcdb", // 사용자의 이더리움 메인넷 지갑 주소 넣기
              'eip155:137:' +  "0xab16a96d359ec26a11e2c2b3d8f8b8942d5bfcdb", // 사용자의 이더리움 메인넷 지갑 주소 넣기
            ],
          },
        },
      });

      const session = await walletKit?.approveSession({
        id,
        namespaces: approvedNamespaces,
      });
      Alert.alert('Session Approved');
      console.log('session', session);
    } catch (error) {
      console.error(error);
      await walletKit?.rejectSession({
        id: params.id,
        reason: getSdkError('USER_REJECTED'),
      });
    }
  }

  useEffect(() => {
    WalletKit.init({
      core,
      metadata: { // 지갑 메타데이터 (본인 상황에 맞게 수정)
        name: 'Demo React Native Wallet Promlee',
        description: 'Demo RN Wallet to interface with Dapps',
        url: 'www.promleeblog.com',
        icons: ['https://your_wallet_icon.png'],
        redirect: {
          native: 'promleewallet://',
        },
      },
    }).then((kit) => {
      setWalletKit(kit);
    });
  }, []);

  useEffect(() => {
    walletKit?.on('session_proposal', onSessionProposal);
    return () => {
      walletKit?.off('session_proposal', onSessionProposal);
    };
  }, [walletKit]);

  return (
    <SafeAreaView style={{ padding: 20 }}>
      <Text>{walletKit?.metadata.name}</Text>
      <TextInput
        placeholder="Enter WalletConnect URI"
        value={uri}
        onChangeText={setUri}
        style={{
          width: '100%',
          marginVertical: 10,
          padding: 10,
          fontSize: 16,
          borderRadius: 8,
          borderWidth: 1,
          borderColor: '#ccc',
          marginBottom: 10,
        }}
      />
      <Button
        title="Connect"
        onPress={() => walletKit?.pair({ uri })}
        disabled={!uri}
      />
    </SafeAreaView>
  );
};

export default App;
더 생각해 보기 🔗
- 세션을 연결한 후, 세션을 해제하는 방법은 무엇일까요?
- 세션을 연결한 후, 디앱과 지갑 사이의 통신을 어떻게 할 수 있을까요?
- eth_sendTransaction, personal_sign 버튼의 기능 활성화하기
- 세션을 연결한 후, 사용자의 지갑 정보를 어떻게 가져올 수 있을까요?